Is your computer connected to multiple networks, like wired lan ethernet and wireless WiFi at the same time? If for some reason you prefer wireless over wired, or vice versa, and want all your internet traffic to go through WiFi wireless network but windows chooses otherwise. In such a scenario, or some other in your case, you might want to disable particular network connection. Disabling WiFi is pretty easy from software interface on windows, but to disable wired connection, you either need to unplug cable which is not recommended at all or you need to disable LAN/ethernet adapter from software interface. If you often need to enable/disable ethernet network adapter on your pc, the job becomes frustrating and tedious. Usually, you launch network and sharing center, then click on change adapter setting from left side options, right click on the desired network adapter and select disable. Repeat the same procedure for enabling. Here in this guide, I’ll show you how to enable/disable desired network adapter via command line, and then to create shortcut on desktop for enabling/disabling particular network adapter, be it ethernet or some other.
Table of Contents
How to enable or disable LAN connection via command line on Windows:
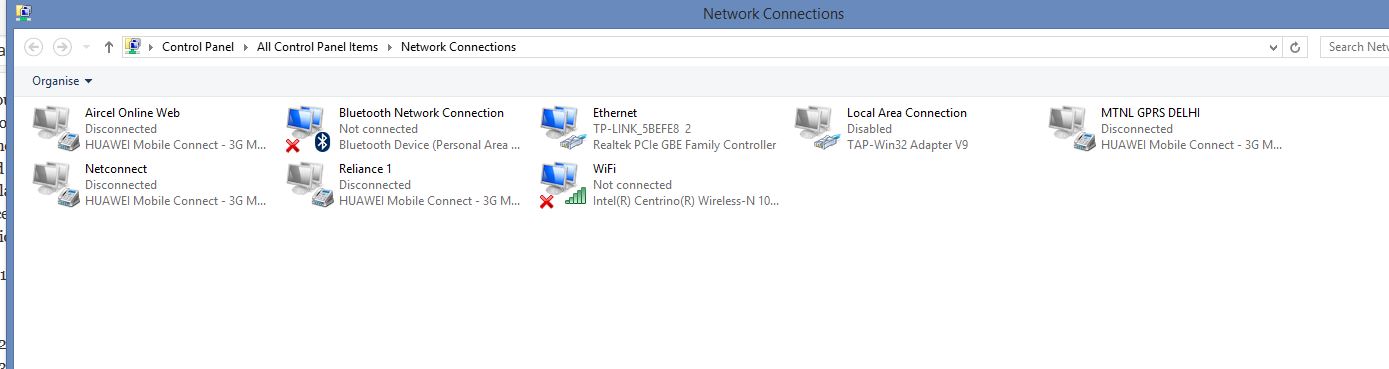
- Open network and sharing center (On Windows 8, Right click on the connected network icon in system tray and select Network and Sharing center option OR just type the term on Start screen. On other windows os, go to control panel and launch from there). Now select Change adapter setting from left-side menu in the window that opened. OR instead of going through all these hassles, just press win key+ r to to open run box and type ncpa.cpl and hit enter. This will directly take you to list of network adapters window.
- Note the name of the desired network adapter that you often enable/disable (It should be, like, Bluetooth Network Connection, WiFi, Ethernet, Local Area Connection, etc.)
- Now open command prompt as admin. (On windows 8.1, right-click on start button and select Command Prompt(Admin) option. On previous version of windows, type cmd in start menu and select the required option/right-click and select run as administrator)
- Now enter this in command prompt window to disable (Replace the interface name in the given command with network adapter name you note in step 2.): netsh interface set interface name=“Ethernet” admin=disabled
- To enable, enter this: netsh interface set interface name=“Ethernet” admin=enabled
- There is another method as well which involves getting list of network adapters along with their indexes and using the index to disable particular one, but the method discussed here is far more convenient.
Now that we know how to enable/disable particular network connection/adapter, creating shortcut is easy.
Create shortcut to connect or disconnect wired LAN or ethernet network connection:
- Right-click on desktop and select new, then shortcut.
- In the box that opens, enter the command as given above. First enter the command for enabling: netsh interface set interface name=”Ethernet” admin=enabled

- Hit on next button. Type the desired name of the shortcut (Enable-wired, or anything like that). Hit on Finish button.
- The shortcut will be created on desktop. Now right-click on the shortcut and select properties. Now, under shortcut tab, hit on advanced option. Select Run as Administrator.
 Hit on Ok > Apply > Ok. Done
 - Repeat the same procedure with disabling command to create shortcut to disable your wired or desired connection from desktop with a single click.
I hope this tutorial helped you. If you face any problem or have any query, feel free to reach us via comments below.
Related posts:
 Top 5 ways to boost WiFi network connection quality
 Windows 8 Network Sharing HomeGroup problem – Fix
 Private Browsing on Internet Explorer 10 in Metro Mode on Windows 8
 Create WhatsApp Contact Chat Shortcut on Android HomeScreen – Video
Very useful. Thanks. The solution would be more elegant if the shortcut can be run silently without the DOS window popping up.
Regards
1. Right click on the shortcut and go to properties.
2. Locate ‘Run’ on the Shortcut tab.
3. Change the value ‘Normal window’ to ‘Minimized’ from the drop down menu.
4. Click apply.
Thank you SO MUCH, I was looking for this
Your syntax is wrong, the correct command is
netsh interface set interface “Ethernet 3” admin=disable
NOT
set interface name= “
He’s not wrong, punk.
Can’t work on Window 10, 64-bit
Why are you all struggling when there is already an EASY way.
1.Just go to adapter settings.
2.Right click on the desired network you want. (ex: Ethernet or Bluetooth or WiFi…)
3.Create a shortcut on desktop.
4.Now just simply right click on shortcut to enable or disable.
Just one shortcut does your need.
Thanks. The easiest way. :DDD
Thanks. The easiest and the simplest way. :DDD
You are great. Thanks!
Thank you man very easy…!!
This only helps in disabling. for enabling, I need to open location
No you dont. you just double click the shortcut on desktop and it enables smart guy
The cmd command works normally for me on windows 10. But the shortcut does nothing. Any ideas why it’s not working?
Try to run as administrator