
After receiving so many requests from fellow readers about rooting GB (Android 2.36) firmware on SGSA (Samsung Galaxy S Advance), here is good news for you! I’ve researched quite a bit for the easiest rooting method and this is what I came up with. If you don’t know what rooting is, or why you should root your android phone, do not follow this tutorial. This tutorial is strictly for those who want and need root on sgsa. Also, this tutorial is for GingerBread, not Jelly Bean. We’ve posted Galaxy S Advance JellyBean Rooting Tutorial also. Read the guide thoroughly and proceed at your own risk. Note that rooting voids warranty so if something undesired happens, you’re on your own.
Table of Contents
Requirements:
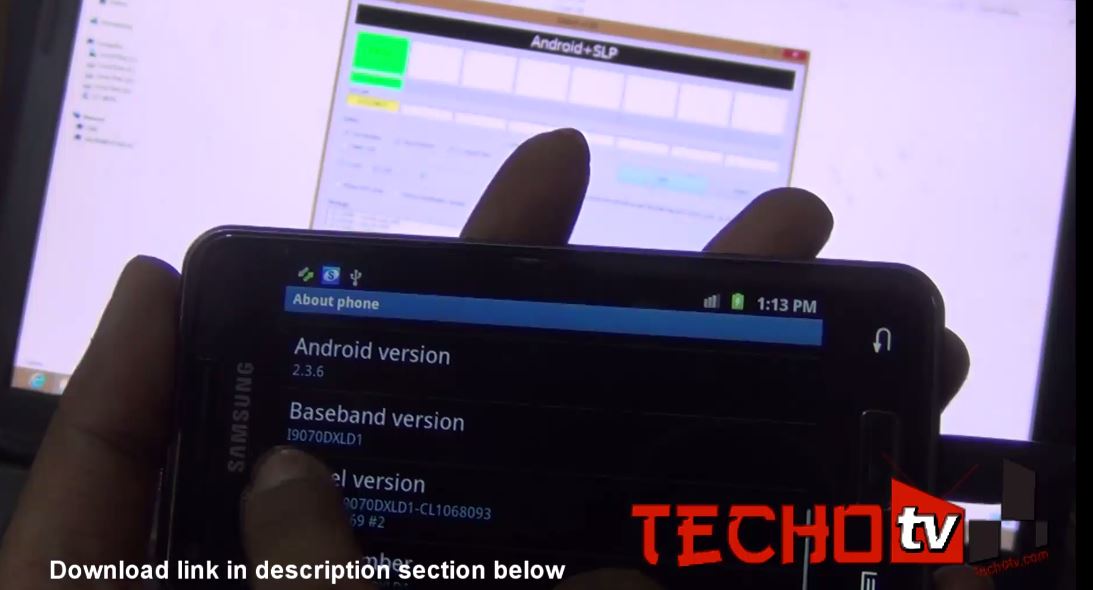
- GT-I9070 smartphone (SGSA). No other model or variant.
- Android 2.3.6 GingerBread OS.
- Fully charged battery.
- usb cable
- PC/Laptop
- Proceed at your own risk. I’ll not be held responsible for any damage to your phone.
- Backup important content of your device.
How to root all GB firmware on SGSA
This method involves changing the stock kernel so this will increase custom ROM Binary counter of the phone as well. This method works for all GingerBread Firmware of Galaxy S Advance be it of any country (including India’s DDLK2, etc).
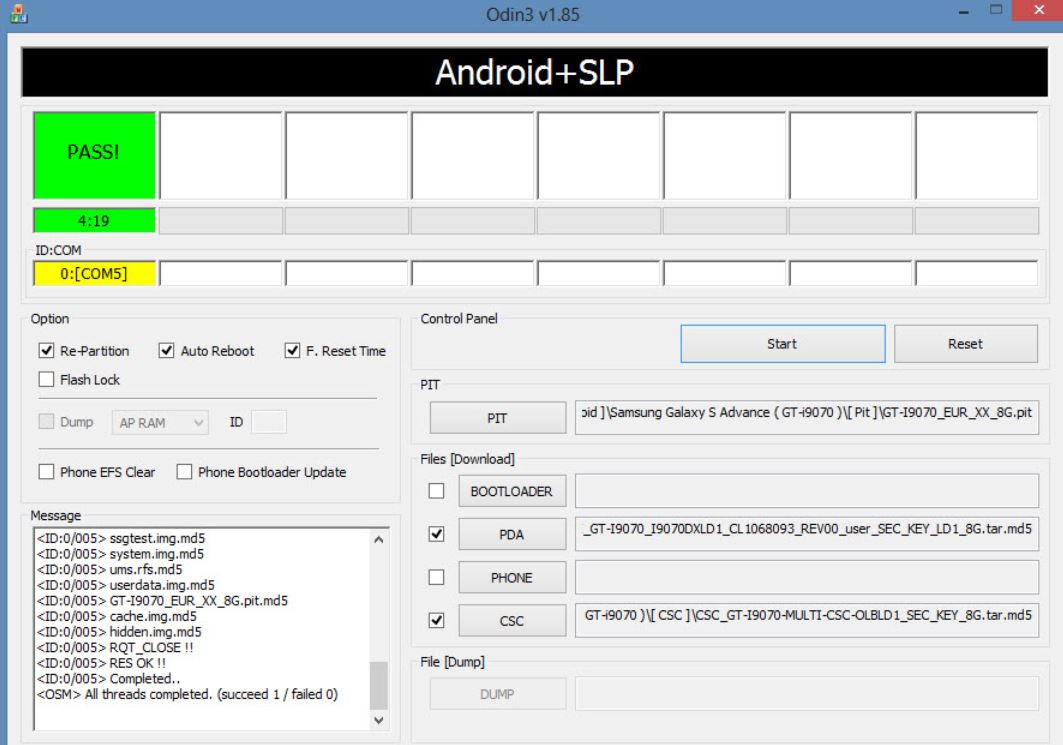
- Download ODIN for SGSA from here.
- On your pc, make sure Samsung Kies is not running.
- Download pre-rooted kernel for Galaxy S Advance GingerBread from here.
- Extract both the download files.
- Run ODIN program.
- In your phone, go to its settings and enable USB Debugging.
- Turn off your phone and start it in Download mode (Press volume down+home+power buttons together for few seconds).
- Connect your phone via usb data cable to pc.
- ODIN will detect your phone.
- Click on PDA button in ODIN and select the kernel file GT-I9070_GB_TWRP_KERNEL.tar.md5 which you downloaded and extracted earlier.
- Make sure nothing else is checked in ODIN (only, Auto-Reboot and F:Reset Time options should be checked)
- Hit on Start button.
- After few minutes, ODIN will display PASS status and your phone will reboot.
- Done. Your phone is now rooted. Try installing SuperSu or other apps which require root permission.
Feel free to ask questions or clear your confusion before following this rooting tutorial. Facing any problem, do ask us, we’ll try to help as much as possible. Do confirm if the method works for you!
Related posts:
 How to get back to GingerBread on Galaxy S Advance from Jelly Bean – Video
 How to Root Android 4.1.2 JellyBean on Samsung Galaxy S Advance
 How to downgrade JellyBean to GingerBread on Galaxy S Advance
 How to root Samsung Galaxy Camera
 How to Root Galaxy S4 – Step by Step Guide – Tested – Working Tutorial
i have read everywhere about rooting gingerbread in sgsa..but found about the workarounds that involves flashing rootkernel.tar.md5 with 8g.pit and then flashing back the stock kernel.tar.md5..then installing superSu or superuser and busybox installer..
but here -> just flash TWRP kernel.tar.md5 with no pit files..i think this kernel is developed by diego_ch of xda.. if this method works , i will be the first one to be happy..hassle-free rooting process of gingerbread like never before..anyone confirm if this method works..
and also SAURABH sir..im in 16gb DDLK2 indian gingerbread…will this method work for me nd wont it eat my internal space like while downgrading..
and also SAURABH SIR,, make a video of rooting sgsa in DDLK2 with this method..please..thnx in advance
we hv to go into recovery or dwnld mode???
My mistake in the original post.. Corrected it.. For flashing via ODIN, we’re always required to go to download mode.. So download mode here as well.
okk…thnx saurabh…one mor que. wiil this rooting shrink my storage of 16 gb model??? n wat dou mean by “pre rooting” n wat will happn if we also select “flash lock” plz reply asap…rest all gud!!!
n i also want to knw that , do we get less features in rooting on “GB” compared to rooting in “JB”???
Rooting gives you root access i.e. system level administrator access to everything on device.. It has to do nothing with features..
pre-rooted means that the specified file is already rooted. One just needs to install it..
Do not select other options than the ones specified in the post..
This thing didnt work on my phone… help out
Which part didnot work?
I followed all the above steps, when i installed supersu, it showed ‘The SU binary needs to be updated.’ Later after pressing continue, it showed installation failed.
To know whether root has taken place or not, i installed root checker. But it showed Status: NOT ROOTED
Ya same happened with my phone.. help out
I followed all the above steps. Then i installed root checker to check if its rooted. It says the device does not have proper root access. Please help.
Support for rooting on gb has been removed and couldn’t be rooted. Try to upgrade to jb with cocore kernel to get smooth n powerful jelly bean
sorry if this is a noob question, but my friend has this phone on gingerbread and he wants to root it, if he follows this steps will the apps and saved data of them be erased?
Excellent. Worked on my 16GB S Advance. Just follow instructions correctly and completely
how to root SGSA GT-I9070P
I have I9070XXLK2 baseband version of Galaxy S Advance GT-I9070 Gingerbread.XXLK2 and i followed the above instructions in Odin..
The process seemed to work with a green Odin PASSEd message but when i intalled Root Checker it says my phone is still not Rooted? Please help?
I
Will it work on ddlk2? plss tell
I followed every step written above but my Samsung s advance with DDLK2 baseband still remains the same as it was earlier. Should i use the pit file too while rooting? Every step goes well. Even Odin shows a green PASS but still phone doesnt have root access ! :(
My DDLK2 Samsung galaxy advance was successfully rooted! :-) People after following this procedure don’t forget to install superuser from Google play store. Then use root checker to see if your phone is rooted or not. Without superuser, root checker will Show “not rooted”, but with super user it’ll Show “rooted”. Email me if you have any doubts. Now my phone works like a charm guys. Installed power amp full version without paying a paisa. :-P
hey Harish, i hve followed all steps perfectly.. but still it is showing dat my phn is not rooted…. i dnt y.. pls help
ThanX
sir i hav done all u suggest… odin shows pass sign
and my kernel version after root 2.6.35.7 TWRP+root@ubuntu-mac
i installed super su….. bt it shows binary are not installed nd super su cant be installed………
sir what to do pllzzz help me…. waiting for your reply…
plllzzzz reply fast
thank you :)
hi.. i used the above method but when i use supersu it says.. there is no su binary installed and supersu cannot install it this ids a problem.. what to do now?
plz tell me the process for I9070 DLK2
what are other cons of rooting this galaxy s advance, except warranty void?
please tell me fast…please
Malicious apps can do harm to your personal data or phone system files..
after installing supersu it says:
“no su binary installed”
what now?
does it realy work on ind ddlk2 firmware ? plz plz plz sourabh if u can manage to make a video demonstration of it ……. dat will be very helpful for us …… please make it…asap ….official ddlk2 to roooting ,..its kina complicated ……and very few blogs even xda released dis twrp karnel quite a few time………….not more ………………and it does not have a video to follow even after subscribing your channel….. :( am fan of your work bro………..
after downgrading my s advance shirnk to 3.91 gb . how can i get full storage of my phone? i search on many websites but not found country’s official gingerbread firmware..can i get full (11.9gb) space after rooting with these steps??
Hi…I tired to go back to GB from JB by this method but my phone is hung now……on start up it doesn’t go beyond the Samsung Galaxy S Advance screen….gets hung there. Pls help immediately as I do not have another handset as of now.
Thanks for all your posts from upgrading to JB, Downgrading to GB, rooting GB…
U R the best..
Works like a charm….For those who are not getting their devices rooted after following steps….Please install SUPER USER not super su from google play after flashing the pre rooted kernel…
Hi Saurabh,
Finally I found something for DDLK2. Followed the process to the T but its been an hour, no sign of PASS from ODIN! How long should this take normally?
I initially did a root for JB 4.1.2, which obviously didn’t work. Has that affected my phone in any way?
Tried it on my GingerBread 2.3.6 i9070 XXLK2
Odin did it’s job, passed, restarted, and then neither superuser or SuperSU detected the libraries…
Gonna try again and report.
Tried 3 times with various SU apps.
If everything else fails, I’ll try to wipe my phone and try again…
it does not work for me..
m using baseband DDLK2.. notin hapens its same as before.
it does not work….
i followed every steps properly but when i download superuser and then use root checker it shows that your sorry! This device does not have root access..
please help