
Ever wondered how your digital camera, that sleek device in your hand, performs its daily magic of freezing moments in time? It’s not just a simple click; there’s a universe of sophisticated technology whirring within, especially at the sensor level, turning light into the digital memories we cherish. We often marvel at the final image, but the journey from a fleeting photon to a vibrant pixel is a story of incredible precision and ingenuity. Let’s pull back the curtain and explore the fascinating process of how digital cameras capture images, right down to the sensor itself.
Table of Contents
The Journey of Light: More Than Meets the Eye
Everything begins with light. When you aim your camera and press the shutter button, light from your subject travels through the lens. The lens, a complex assembly of glass elements, focuses this light onto a tiny, yet immensely powerful, component: the image sensor. The aperture (the opening in the lens) controls how much light passes through, while the shutter speed dictates how long the sensor is exposed to this light. But the real magic happens when these photons of light meet the sensor.
The Heart of the Matter: The Image Sensor
At the core of every digital camera lies an image sensor. Think of it as the digital equivalent of film. This semiconductor chip is covered in millions of microscopic light-sensitive spots called photosites, often referred to as pixels (though technically a pixel is the final data point in an image, each photosite contributes to a pixel). Each photosite is designed to collect photons – the fundamental particles of light.

There are primarily two types of image sensors used in digital cameras:
1. CCD (Charge-Coupled Device)
For a long time, CCD sensors were the champions of image quality. In a CCD, when light strikes a photosite, it generates an electrical charge. To read this information, the charges from each photosite are transferred sequentially, pixel by pixel, row by row, across the chip to a single (or few) output node(s). This charge is then converted to a voltage and then into a digital signal.
- Pros: Historically, CCDs offered superior image quality with high sensitivity and low noise, leading to their use in high-end applications.
- Cons: They consume more power, are slower to read out data, and are more complex and expensive to manufacture compared to their counterparts.
2. CMOS (Complementary Metal-Oxide-Semiconductor)
CMOS sensors work on a different principle. Each photosite in a CMOS sensor has its own amplifier and often other processing circuits (like noise reduction or analog-to-digital conversion) directly associated with it. This means the charge-to-voltage conversion happens at each pixel site, rather than centrally.
- Pros: CMOS sensors are generally less expensive to produce, consume significantly less power (crucial for battery life in DSLRs, mirrorless cameras, and smartphones), and offer much faster readout speeds. This speed enables features like high-frame-rate video and rapid burst photography. Modern CMOS sensors have also largely caught up to, and in many cases surpassed, CCDs in terms of image quality and low-light performance.
- Cons: Historically, they were prone to more noise, but advancements have drastically mitigated this.
Today, CMOS technology dominates the digital camera market, from smartphones to professional full-frame cameras, due to its versatility, speed, power efficiency, and ever-improving image quality.
From Photons to Pixels: The Magic Unveiled
So, how does light actually become a digital value that forms your image?
- The Photoelectric Effect: When photons hit a photosite (which is essentially a photodiode), they knock electrons loose. The brighter the light hitting a particular photosite, the more photons it receives, and consequently, the more electrons are generated. This creates an electrical charge proportional to the light intensity.
- Counting the Charge: After the exposure time (dictated by your shutter speed) ends, the accumulated charge in each photosite is measured. A stronger charge means a brighter part of the image, while a weaker charge indicates a darker area.
- Analog-to-Digital Conversion (ADC): This electrical charge is an analog signal. To be understood by a computer or digital device, it must be converted into a digital signal. This is where the Analog-to-Digital Converter (ADC) comes in. The ADC measures the voltage of the analog signal from each photosite and assigns it a numerical value. The precision of this conversion is determined by the bit depth (e.g., 12-bit, 14-bit, or 16-bit). A higher bit depth means more possible tonal values per pixel, leading to smoother gradations and greater dynamic range.
Seeing in Color: The Bayer Filter Array
Here’s a fascinating tidbit: image sensors are inherently monochrome. They can only measure the amount of light, not its color. So, how do we get vibrant color images?
The answer lies in a microscopic marvel called the Bayer filter array (or Color Filter Array – CFA). This is a mosaic of tiny red, green, and blue filters placed over the grid of photosites. The most common pattern, devised by Bryce Bayer at Kodak, is the RGGB pattern: each 2×2 group of photosites has one red, one blue, and two green filters. Why two green? Because the human eye is most sensitive to green light, so dedicating more sensor area to green helps produce images that appear more detailed and natural to us.
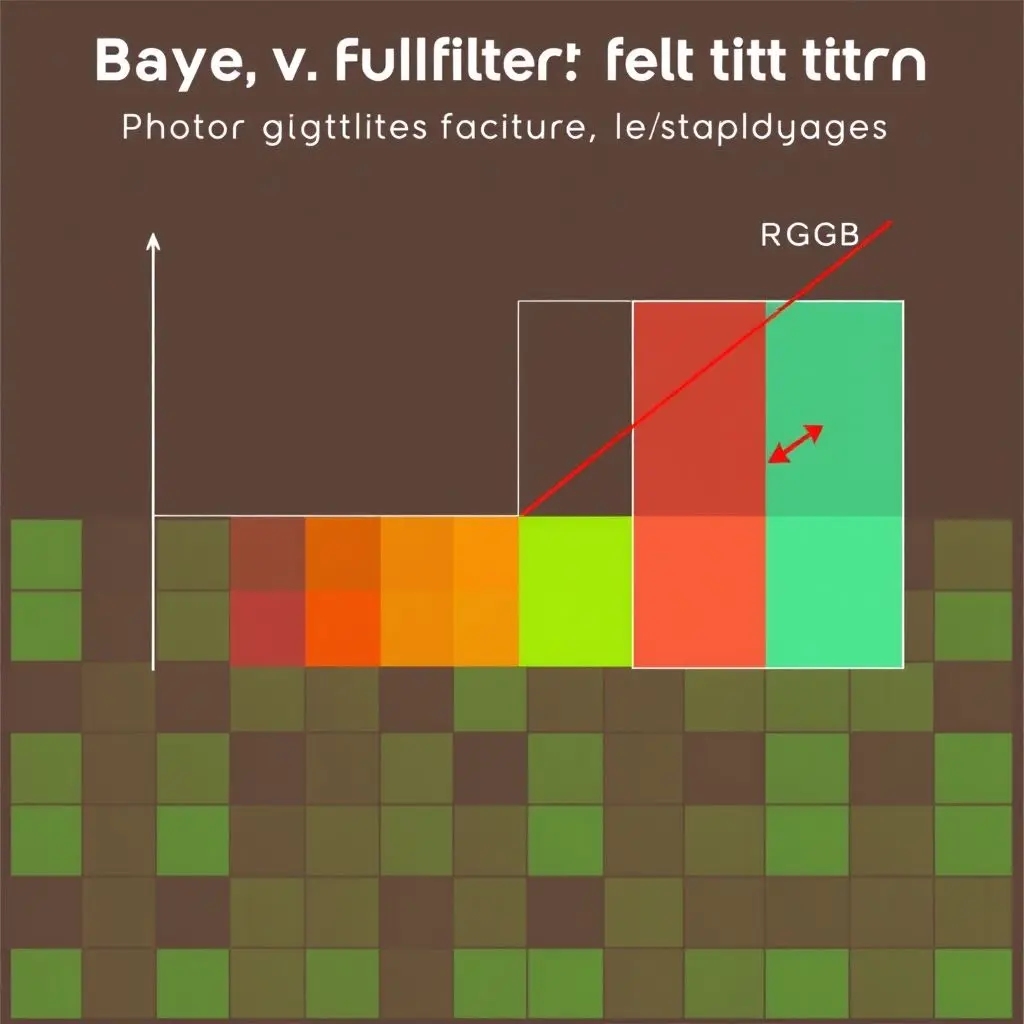
So, each photosite under the Bayer filter only records the intensity of one specific color of light (red, green, or blue).
Demosaicing: Painting the Full Picture
At this stage, we have a grid of pixels, but each pixel only knows about one color. For example, a pixel under a red filter knows how much red light it received, but nothing about green or blue for that specific point. This raw, mosaic-like data needs to be processed to create a full-color image. This process is called demosaicing or de-Bayering.
Demosaicing algorithms are sophisticated interpolation techniques. For each pixel, the algorithm looks at the values of its neighboring pixels (which captured different colors) to intelligently estimate the missing two color values. For instance, to find the blue and green values for a ‘red’ pixel, the algorithm analyzes the nearby blue and green pixels. The complexity and quality of these algorithms significantly impact the final image’s sharpness, color accuracy, and the presence of artifacts like moiré patterns.
Beyond the Sensor: Initial Image Processing
Once the demosaicing is complete, we have a full-color representation of the scene. However, the journey isn’t quite over. This data then typically undergoes further in-camera image processing (especially if you’re shooting in JPEG format). This can include:
- White Balance: Adjusting colors to appear natural under different lighting conditions.
- Noise Reduction: Minimizing random speckles, especially in images taken at high ISO settings.
- Sharpening: Enhancing edge detail.
- Contrast and Color Adjustments: Applying specific looks or styles.
- Compression: If shooting JPEG, the image is compressed to save file space. If shooting in RAW format, most of this processing is bypassed, giving you the ‘digital negative’ with maximum data from the sensor.
The Impact of Sensor Size
You’ve probably heard terms like “full-frame,” “APS-C,” or “Micro Four Thirds.” These refer to the physical size of the image sensor. Sensor size is a critical factor influencing several aspects of image quality and camera characteristics:
- Light Gathering Ability: Larger sensors generally have larger individual photosites (for a given megapixel count). Larger photosites can capture more photons, leading to better performance in low light (less noise) and often a wider dynamic range (the ability to capture detail in both very bright and very dark areas of a scene simultaneously).
- Depth of Field: Larger sensors make it easier to achieve a shallower depth of field (blurry background), which is often desired for portraiture and artistic effects.
- Field of View (Crop Factor): Smaller sensors have a “crop factor,” meaning they capture a narrower field of view compared to a full-frame sensor when using the same focal length lens.
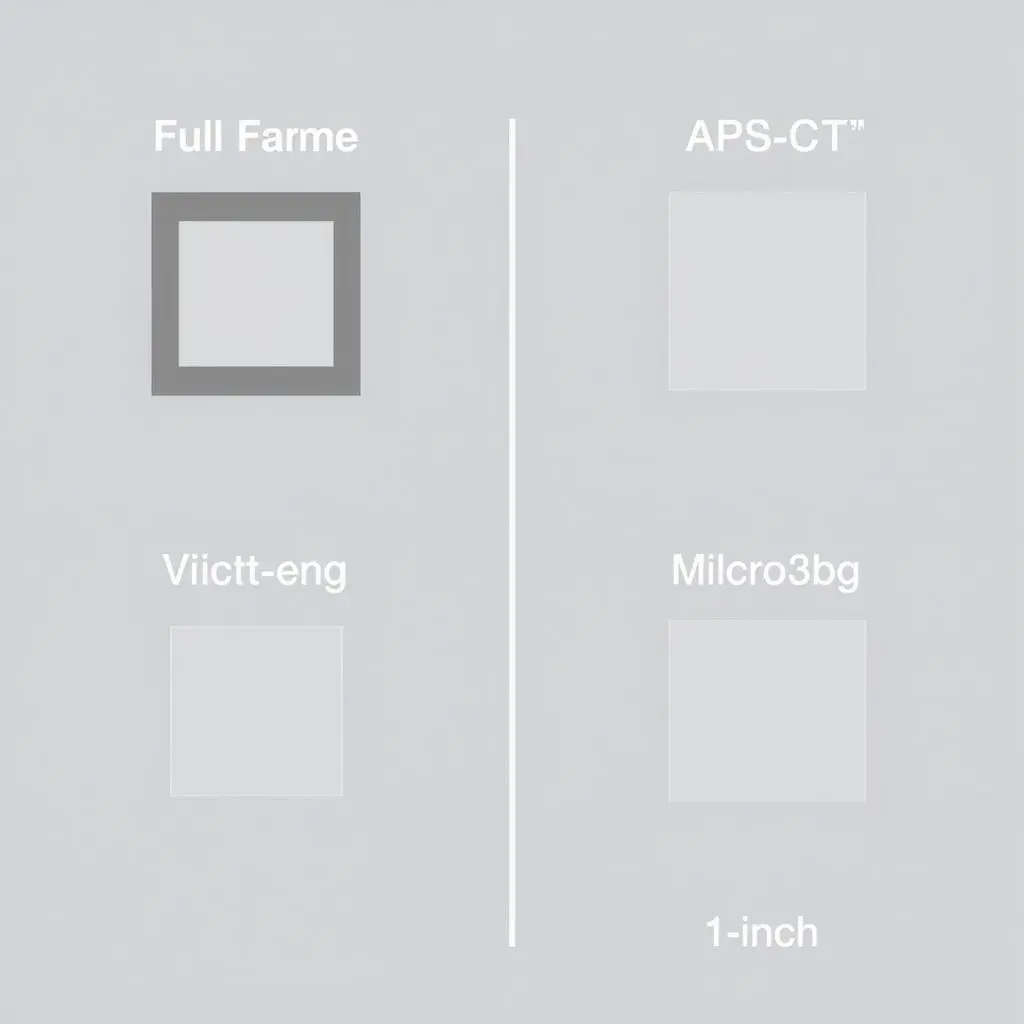
While larger sensors generally offer advantages, advancements in sensor technology mean that even smaller sensors in modern cameras and smartphones can produce stunning results.
Frequently Asked Questions (FAQs)
- What exactly is a pixel in a digital image?
- A pixel (picture element) is the smallest individual dot or unit of information that makes up a digital image. On the sensor, a photosite collects light information that ultimately contributes to a pixel in the final image. After demosaicing, each pixel in your image has specific color (Red, Green, Blue values) and brightness information.
- Do more megapixels always mean a better picture?
- Not necessarily. Megapixels (millions of pixels) determine the resolution or size of an image. More megapixels mean you can print larger or crop more aggressively without losing detail. However, image quality is also heavily influenced by sensor size, lens quality, and image processing. Cramming too many megapixels onto a small sensor can lead to smaller photosites, which might perform worse in low light and have less dynamic range. It’s a balance.
- How does ISO setting relate to the image sensor?
- ISO refers to the sensitivity of the image sensor to light. When you increase the ISO, you’re essentially amplifying the signal (the charge collected by the photosites) before it’s converted to a digital value. This allows you to shoot in darker conditions or use faster shutter speeds. However, amplifying the signal also amplifies any noise present, which is why higher ISO settings often result in grainier images.
- Why are RAW files so much larger than JPEGs?
- A RAW file contains the minimally processed data directly from the image sensor. This includes all the original color information (before extensive demosaicing is finalized in-camera for JPEG) and a wider range of brightness levels (higher bit depth). It’s like a ‘digital negative’ offering maximum flexibility for post-processing. JPEGs, on the other hand, are processed in-camera (white balance, sharpening, noise reduction applied) and then compressed (losing some data) to create a smaller, ready-to-share file. This processing and compression is ‘lossy,’ meaning some original image information is discarded.
Wrapping Up Our Photographic Journey
So, the next time you frame that perfect shot, take a moment to appreciate the silent symphony of physics and engineering unfolding within your camera. From a fleeting photon to a lasting pixel, it’s a remarkable journey, one that transforms the ephemeral into the eternal, all thanks to that incredible digital camera sensor working tirelessly behind the lens. Understanding this intricate image capture process at the sensor level not only deepens our appreciation for photography but also empowers us to make more informed choices about the gear we use to tell our visual stories.
Related posts:
 From Pocket Pixels to Pro-Level Shots: How Smartphones Redefined Photography
 Change songs without touching Android phone – Sensor Music Player
 Airtel Digital TV Pocket TV app for smartphones launched, Download
 Android 4.4 KitKat leaked Images, Release Date, Features
 Samsung Galaxy NX Android DSLR Mirrorless Camera Images, Details Leaked