
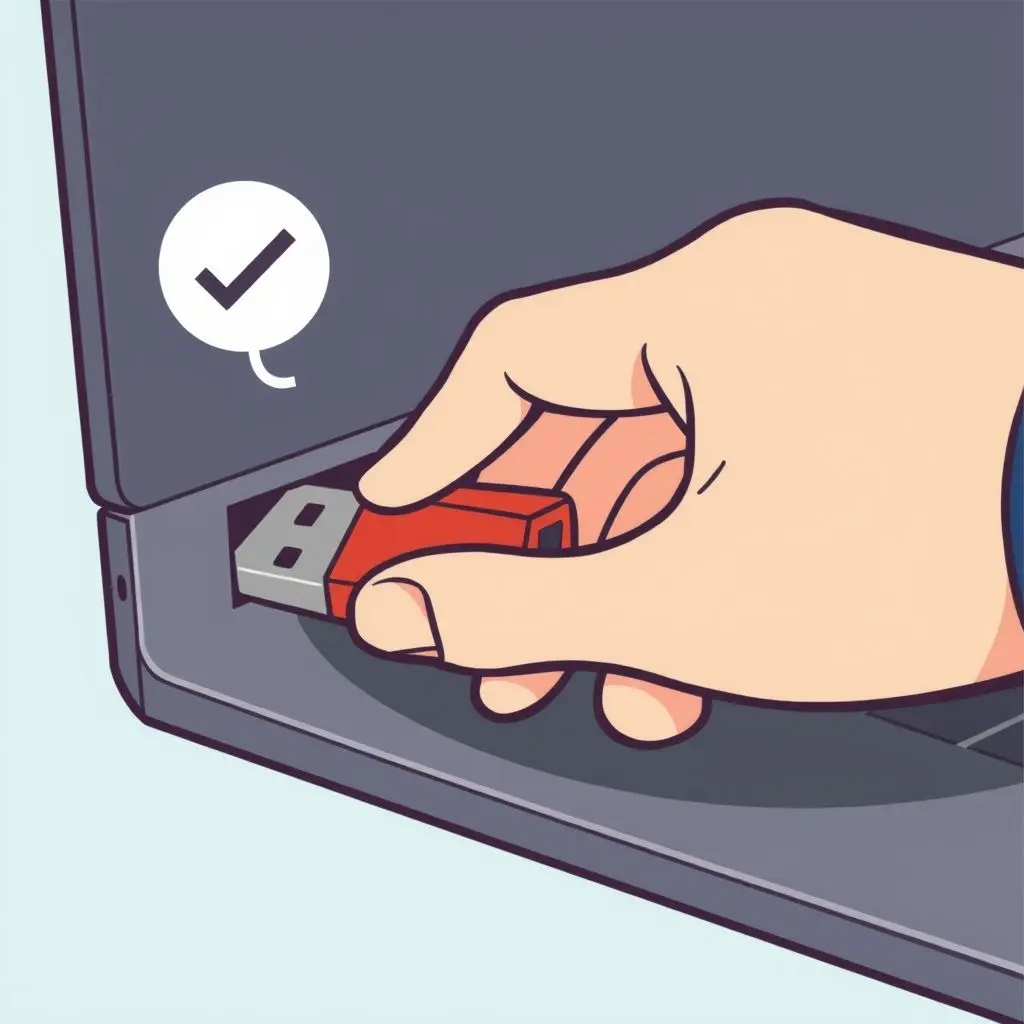
We’ve all felt that tiny twinge of anxiety. You’ve copied your files, you’re in a hurry, and that little USB stick is just sitting there, waiting to be unplugged. But then you remember the golden rule, whispered in hushed tones by tech-savvy friends and stern error messages of yore: “Safely Eject Hardware.” It’s a ritual, a safeguard against digital disaster. But what if we told you that for many, this daily digital prayer is… mostly unnecessary these days?
Yes, the idea that you absolutely *must* perform the ‘Safely Eject’ dance every single time you want to remove a USB drive has become a bit of tech folklore. It’s a persistent myth rooted in a time when operating systems handled external media quite differently. Thanks to updates in modern operating systems, particularly Windows, the landscape has changed significantly.
Before we dive deeper into the how and why, take a moment to watch this short explanation that might just blow your mind:
That little clip hints at the core of it, doesn’t it? The tech landscape shifted quietly, and many of us were left performing an outdated ritual out of habit or fear.
Table of Contents
The Myth vs. The Modern Reality: Quick Removal is Your Friend
The necessity of ‘Safely Eject’ stemmed primarily from something called write caching. When you copy files to an external drive, the operating system doesn’t always write the data directly to the drive’s flash memory immediately. Instead, it might temporarily store the data in a buffer (the cache) to speed things up. It tells you the file is copied, but the data is actually sitting in RAM, waiting to be written to the drive in a more efficient batch.
If you yanked the drive out before this cached data was written, you’d end up with corrupted or incomplete files on the drive – a frustrating and potentially data-losing experience. ‘Safely Eject’ would tell the system to flush all pending cached data to the drive and then unmount the drive, signaling it was safe to remove.
However, recognizing how users actually interact with portable drives (they often *don’t* eject), Microsoft made a significant change starting with Windows 10 version 1809. They changed the default policy for external storage devices to “Quick Removal.”
What Does “Quick Removal” Mean?
Under the Quick Removal policy, Windows disables write caching for the device. This means that when you copy a file to the USB drive, the operating system attempts to write that data directly to the drive as soon as possible. There’s minimal to no data being held back in a cache on your computer that hasn’t yet made it to the drive.
Because data is being written in real-time (or as close to it as possible) and isn’t being held in a cache, the risk of data corruption from sudden removal is drastically reduced once the initial file transfer window is complete. Essentially, the drive is *usually* ready to be pulled the moment the copy progress bar disappears.
The Alternative: “Better Performance”
While Quick Removal is the default, there’s still an option called “Better Performance.” This setting enables write caching for the device. It can potentially offer faster transfer speeds, especially when writing many small files or large batches of data, because the system can manage the write operations more efficiently using the cache.
If your USB drive is configured for “Better Performance,” then the old rule applies: you absolutely *should* use ‘Safely Eject’. Pulling the drive while caching is enabled without ejecting is risky and highly likely to cause data corruption if pending writes haven’t completed.
When Can You Just Pull It?
Assuming your Windows system (version 1809 or later) is using the default “Quick Removal” policy for your USB drive, you can generally pull the drive out without using ‘Safely Eject’ under these conditions:
- There are no files actively being transferred to or from the drive.
- No programs are currently using or accessing files on the drive in the background.
If you’ve just finished copying files and the progress window is gone, in most cases on modern Windows with the default setting, you’re good to go.
When Should You Still Eject (or Be Cautious)?
Even with Quick Removal, there are scenarios where caution is wise or ejecting is still necessary:
- Active File Transfers: Never pull a drive while files are actively copying or being written to it. This is the most surefire way to corrupt data, regardless of the setting.
- “Better Performance” Policy Enabled: If you have manually changed the policy for a drive to “Better Performance” in Device Manager, you *must* use ‘Safely Eject’ every time to ensure the cache is flushed.
- External Hard Drives (HDDs): While many HDDs also default to Quick Removal, some users prefer Better Performance for these larger, often slower drives. Also, HDDs have spinning platters, and sudden removal during an intense operation could theoretically pose a minor risk, though data corruption is the primary concern. When in doubt, eject large external HDDs.
- Other Operating Systems: macOS and Linux handle disk policies differently. While they often have robust caching mechanisms that require unmounting (the equivalent of ejecting), their default behaviors might not be identical to Windows’ Quick Removal. It’s generally safer practice to unmount/eject on these platforms unless you are certain of their specific policies.
- Software Accessing the Drive: Some software might be using files on the drive in the background even if you aren’t actively copying. Closing relevant programs before removing the drive is a good habit.
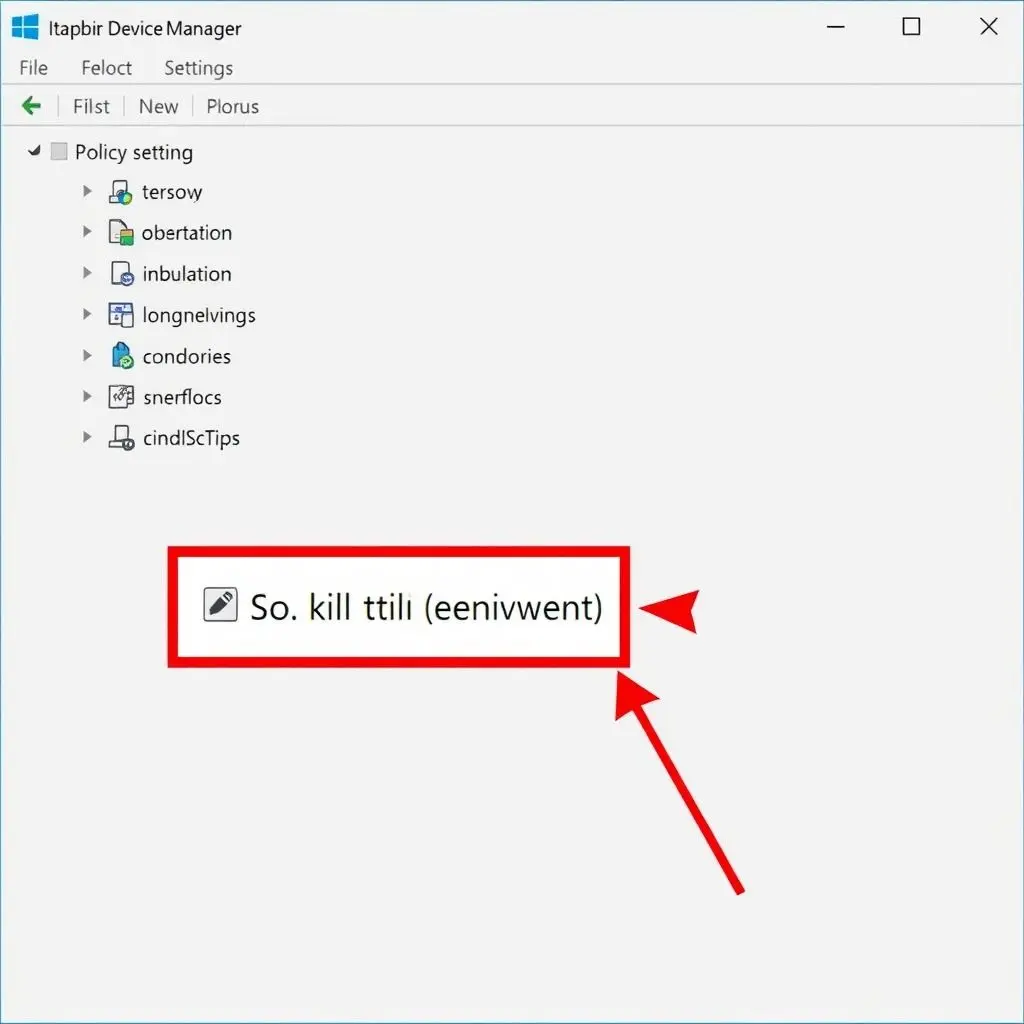
How to Check Your Drive’s Policy in Windows
Want to be absolutely sure which policy your USB drive is using? It’s easy to check:
- Plug in the USB drive.
- Right-click the Start button and select “Device Manager.”
- Expand “Disk drives.”
- Find your USB drive in the list (it might show its model name). Right-click it and select “Properties.”
- Go to the “Policies” tab.
- Here you will see the selected removal policy: “Quick removal (default)” or “Better performance.”
- You can change the setting here, but remember the implications of “Better Performance.”
So, Is the Ritual Entirely Dead?
For many, the strict need to ‘Safely Eject’ every single time they remove a standard USB flash drive on a modern Windows PC (since late 2018) with default settings is indeed gone. The Quick Removal, policy ensures that pending writes are minimized, making sudden removal much safer from a data corruption standpoint.
However, adopting a cautious habit isn’t necessarily a bad thing. If you deal with multiple operating systems, share drives with others who might use older systems, or frequently change device policies, using ‘Safely Eject’ is a harmless practice that guarantees data integrity by flushing the cache and properly unmounting the drive. It adds a few seconds but removes any doubt.
Think of it this way: the system is designed to be more forgiving now, but being mindful of active transfers and checking your settings occasionally is still smart digital hygiene. The fear can largely subside, but a little awareness never hurts.
![]()
Frequently Asked Questions
Q1: Does this apply to all USB devices, like external SSDs or card readers?
Generally, yes. The policy setting in Device Manager applies to external storage devices connected via USB. This includes USB flash drives, external SSDs, and external HDDs. Card readers themselves don’t usually have this policy, but the SD card or MicroSD card inserted into them will be treated as an external drive by the system and subject to the policy.
Q2: How do I know if my Windows is version 1809 or newer?
You can check your Windows version by pressing Windows Key + R, typing winver, and pressing Enter. Look for the “Version” number in the dialog box that appears. Version 1809 was released in late 2018. Most Windows 10 and all Windows 11 installations today are newer than this.
Q3: Is there any other risk besides data corruption if I don’t eject?
While data corruption is the primary risk associated with cached writes, pulling a drive while the system is intensely interacting with it (even reading, in rare cases) could theoretically lead to minor system instability or errors. However, these are far less common than data corruption and usually resolve immediately. On external HDDs, sudden power loss during writes could potentially cause minor wear over time, but modern drives are quite robust. For flash drives and SSDs, this isn’t a mechanical concern.
Q4: Does Safely Eject physically power down the USB drive?
No, ‘Safely Eject’ (or unmounting) does not typically remove power to the USB port. It instructs the operating system to flush caches, cease all read/write operations to the device, and logically disconnect it from the file system. The drive remains powered until you physically remove it.
Q5: Is Quick Removal slower for writing files?
Potentially, yes. By disabling write caching, the system has to wait for each write operation to complete on the drive before proceeding as much as it would if it could use the cache. For typical USB flash drive uses, the difference might be negligible. For demanding tasks or with faster drives, “Better Performance” *can* offer faster write speeds, but you trade convenience for that speed by needing to eject.

Putting the Myth to Rest
So, next time you’re ready to pull out that USB drive, pause for a second. Are files actively transferring? Is the device set to Better Performance? If the answer to both is no, on a modern Windows machine, you can likely bid farewell to the ‘Safely Eject’ ritual for that drive. The tech evolved, and our habits can too.
Related posts:
 How to remove recent files, frequent folders in Quick Access File Explorer on Windows 10 PC
 New Android malware takes good care of your privacy!
 Samsung Gear manager app for its Smartwatch revealed
 Apple iWatch – All you need to know – revealed from patents
 How to upgrade to Windows 8.1, its price, other details