In this tutorial, we’ll learn how to install CWM recovery on Xiaomi Mi 3 and how to root the device. CWM recovery is feature-rich and has lots of options including nandroid recovery and true dual boot feature, whereas stock mi3 recovery is dull boring and very simple. Also, to root mi3 easily on newer miui firmwares/versions, CWM recovery is must. Great news is that rooting mi3 doesn’t void warranty unlike most other companies.
Table of Contents
Requirements:
- At least 50 % charged Mi3.
- This tutorial is for Mi3 WCDMA(3g) version. To confirm this, go to setting > about phone. If your model number is Mi 3W. This is for you. In India, this model is sold. Anyways, this guide is not limited to any particular country. All you need to do is to confirm your model number before proceeding with this tut.
- You don’t need pc for this.
- Proceed at your own risk.
This guide is completed in two phase – 1st, we need to flash cwm recovery. 2nd, we need to root the device with the help of cwm recovery and supersu app.
How to flash CWM recovery on Xiaomi Mi 3:
- Download CWM recovery for Xiaomi Mi 3w from here. Copy the zip file to your phone.
- Launch Updater app from tools folder on your homescreen. (If it is not visible for some reason, you can just go to settings> about phone> system updates) It should automatically start checking updates, let it complete or tap on back button to cancel checking.
- Press menu/option button and tap on select update package option. Locate CWM recovery file that you copied onto your smartphone in 1st step.
- Update it. When the process is complete, tap on reboot to finish button. Your mobile phone will be rebooted.
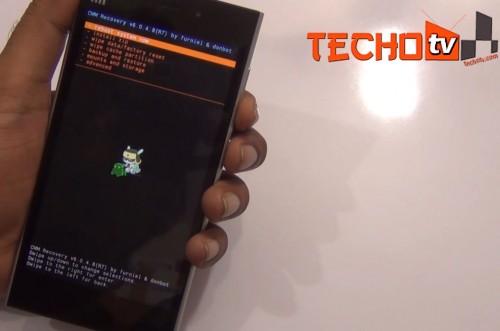
- Congrats, now you’ve cwm recovery on your device. To confirm the same (hold your patience, no need to confirm now as we’ll do that during rooting in the next phase), you can launch updater app again, tap on menu key and select reboot to recovery option. In switched off state, pressing volume up+power keys together for few seconds start the phone directly in recovery mode.

How to root Xiaomi Mi 3:
- Go to Google Play Store and install SuperSu app (this one from here)
- When you launch SuperSu app, It’ll display error that there is no su binary installed. Tap on ok.
- Reboot your phone to recovery mode (Go to updater app > menu key > reboot to recovery)
- You can see CWM recovery now. Use volume keys to navigate up and down and power key to select any particular option.
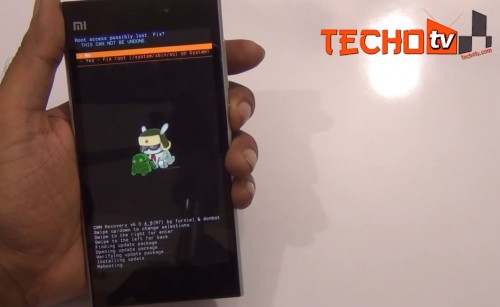
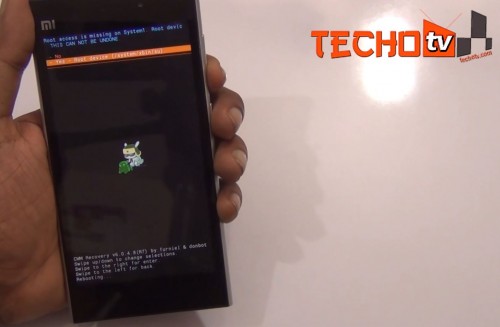
- Select reboot system now option. It’ll prompt that root access is missing on system 1 or system 2. Select yes(root device) at each prompt. It may also prompt you to disable recovery flash, select yes on that as well.

- Once the phone is rebooted, launch supersu app again. SuperSu will prompt you to update su binary. Tap on Continue button and then select TWRP/CWM button on the next step. Phone will be automatically rebooted and su binary will be updated. You also try normal method in this step if twrp/cwm method doesn’t work (if you try normal method, you need to reboot your phone manually when it displays installation success.).
- It’ll then display “Root Access possibly lost, fix?“. Whenever this message appears, just select No. Phone will be rebooted again.

- Congrats, your Mi3 is now rooted. Launch SuperSu app and it will not display any error. You can go ahead and install your favorite root apps or root checker to confirm it.
After MIUI Update:
Whenever MIUI is updated on your phone, you’ll need to repeat both phases again i.e. flash cwm recovery and root using SuperSU, as Root access and CWM recovery are lost each time phone is updated to newer firmwares. This is also the trick for unrooting, just use select update package option of updater app and install stock MIUI version to unroot. (with OTA updates, download MIUI versions are stored in download_rom folder)
For any doubts, queries, feel free to ask us in comments below.
Related posts:
 How to install CWM Recovery on Galaxy S4 GT-I9500 and Root/Unroot it
 How to Root Android 4.1.2 JellyBean on Samsung Galaxy S Advance
 How to root XWLS8 or XXLS8 Jelly Bean On Galaxy S2 Android 4.1.2
Root Android 4.4.2 ROM on Galaxy S4 GT-I9500 (All Countries/all firmwares) – Video
How to root XWLS8 or XXLS8 Jelly Bean On Galaxy S2 Android 4.1.2
Root Android 4.4.2 ROM on Galaxy S4 GT-I9500 (All Countries/all firmwares) – Video
Yes… Its working great… Thanks ji…