Have you already upgraded your older windows machines to the latest version i.e. Windows 8? If yes, does everything, your apps and windows os work as expected? If you’re satisfied with the upgrade, you may want to delete old version of windows completely from system. Whenever we upgrade windows, previous version of windows go into a system created folder called windows.old which reside on the same drive on which windows is installed. This windows.old take up unnecessary space and it is advisable to delete it if you’re happy with the upgraded windows (but unfortunately this can not be deleted by selecting it and pressing delete key on keyboard, because this is system folder). For those with immense storage capacity on windows don’t need to bother, but if you’re using SSD on your system, you do know how valuable every GB’s for you. I use SSD on my system and so I always try to make my SSD free of unnecessary clutter or unused files so as to make space for my os, programs and other useful data. For example, I just upgraded my windows 7 laptop to windows 8 and I found out that my old windows installation was taking as large as 17GB of disk space on my SSD which I use as primary storage drive for OS and programs. Furthermore, leftovers of windows installation i.e. temporary windows installation files which are no longer needed were adding about 6 GB of further waste. So, I cleaned up my C drive which is where windows is installed to free up necessary disk space of about 24 GB.
Here is how to do it:
- Press win key+ r and type cleanmgr and hit OK. Alternatively, on start screen, type disk cleanup (As soon as you start typing, windows 8 will automatically start searching), then choose Settings from the right side below the search box, select the option marked Free up disk space by deleting unnecessary files which would appear in search results then.
- Choose your windows drive (default is C on most systems) and hit Ok.
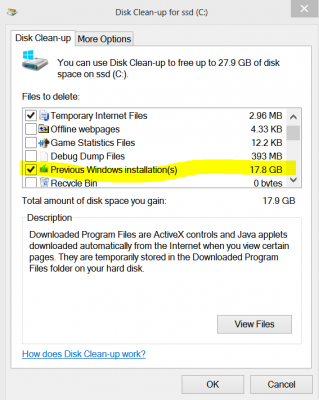
- In the dialog box that opens, click on Clean System Files button. Windows 8 will rescan your drive.
- Now check option from the files to delete box – Previous Windows Installation.

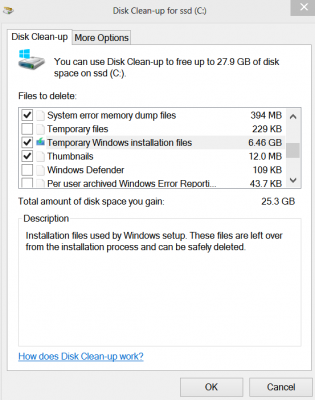
- Also tick mark the option – Temporary Windows Installation files.

- Now click on Ok button. Within few minutes, windows 8 will successfully delete those unnecessary files and free-up disk space.
If you’ve not yet upgraded, we’d advise you to go with Windows 8 unless you really have strong reason not to. If you’re confused between various version of windows, you can read our post on windows 8 version comparison . Feel free to ask if you’ve any doubts. We personally respond to each comment posted on our website because our genuine readers like you are much more valuable to us. We’ll soon publish a detailed walkthrough guide and reviews on Windows 8 pro to assist new users on getting started with win8. Check out other interesting Hot-To and tutorials on windows 8 on our website. Do not forget to subscribe to our updates via email or follow us on Google plus or like us on FB.

Thanks, I found it useful!